

Every Three King's Day, or thereabouts depending on school schedules, we gather with family and make beeswax candles. It's amazing to see blocks of hard wax and bits of string become gorgeous creations. The first year we tried this we started with simple dipped straight candles. Over the years, we have started adding colors, designs, and playing with interesting shapes.


To make your own candles you will need:
 |
| Dipping a candle |
-A large pot- one that you don't mind getting covered in wax, we have a dedicated one now. Thrift stores are a great place for these.
-A tall thin can- we found a tall metal juice can (Juicy Juice) that works great. You want a can that is tall enough for dipping (your candles can only be as tall as the can) yet narrow enough that you don't need enormous amounts of wax as you will be filling it to the top.
-Beeswax- this can be purchased in block form or little pellets. The pellets melt faster, but the blocks are typically less expensive. You can find beeswax at many large craft stores or on-line.
-Wick- you can purchase this at any craft store. The thinner type is best for dipping
-Colored wax- We use Stockmar Decorating Wax. A Child's Dream Come True is a great source for this. We also use bits of beeswax form my children's collection.
-Pre-tabbed wicks and small containers (optional, for making votive-type candles)
-Newspaper or drop cloths to cover counters and floors. Even with these you will be scraping wax for days.
 |
| Basket of colored beeswax |
A few hours before dipping, you will need to start to melt the wax. If you have the wax in a big block you will want to break it into smaller pieces to fit in your can. Place the block in a pillowcase or ziptop bag and hand a child a sledgehammer and let them go to town- outside and supervised is best! (btw- this might be the highlight of the day for the more physically inclined of the group) Add pieces of the wax to the can, then place the can in the big pot. Add water to the big pot (the can shouldn't float) and place the pot on the stove top, at medium heat. As the wax begins to melt, add more pieces of wax until the smaller can is filled to the top. You don't need the water to boil; just below a simmer seems to work well. When the wax is fully melted you can start dipping. Cut a wick to the length of the desired candle, no longer than the can, plus about 1 inch. Holding one end of the wick, slowly dip it into the hot beeswax. Remove the wick slowly and let drip. Allow the candle to cool before redipping. Continue to dip until the candle is the desired thickness. You might want to trim the drips off the bottom of the candle with a sharp knife a few times during the dipping process if you want a flat bottomed candle.


 |
| Candles for next year's advent spiral, still in process |
Variations:
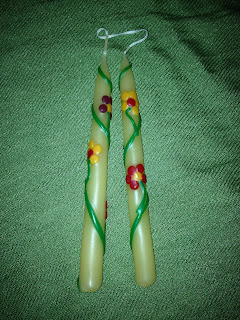
-Add colored wax in different shapes and designs. It's nice to dip one final time after adding colors to help the colors adhere.
-Press beads into the candle while still warm. One final dip with help the beads adhere.
-Coil the wick around a pencil to make a spiral. To do this, dip the wick 2-3 times, then coil around the pencil allowing the wick to fully cool before removing the wick from the pencil. After the next dip, you will need to adjust the coil a bit to retain the shape. Play around with different widths and lengths.
-We found wooden pieces that allow you to dip multiple wicks at once. They came in a large Stockmar candle making kit. You could also make your own fairy easily by cutting notches in a small piece of wood.
 |
| The start of a spiral candle |
 |
| Pouring the wax |
 |
| Votive type candles |

Laissez les bon temps rouler!
Oh - Laissez les bon temps rouler - you made me rire my head off. This is a beautiful tutorial, and the spiral candles are simply fab. thank you for the work you went to on this entry - it was really very well done. (that sounds like a spam comment. shoot). But it was. Lovely.
ReplyDeleteK- Thanks for your kind words. It's been such fun watching the children get more and more creative every year with the candles. I'm still learning about the wonderful world of blogging so I very much appreciate the comments.
DeleteGoodness, your candles turned out beautifully! What a lovely blog you have here. Blessings to you.
ReplyDeleteKelly- thank you for yor lovely comments. We started this tradition many years ago with simple dipped candles. The children have had such fun coming up with new designs and methods of shaping candles. As children are want to do, they always have new creative ideas. This year there was even a wrapping method that involved a beer bottle (dads and college kids!)
Delete